Houdini FX in Unreal?
Automating 4D Gaussian Splat Training with TOPs
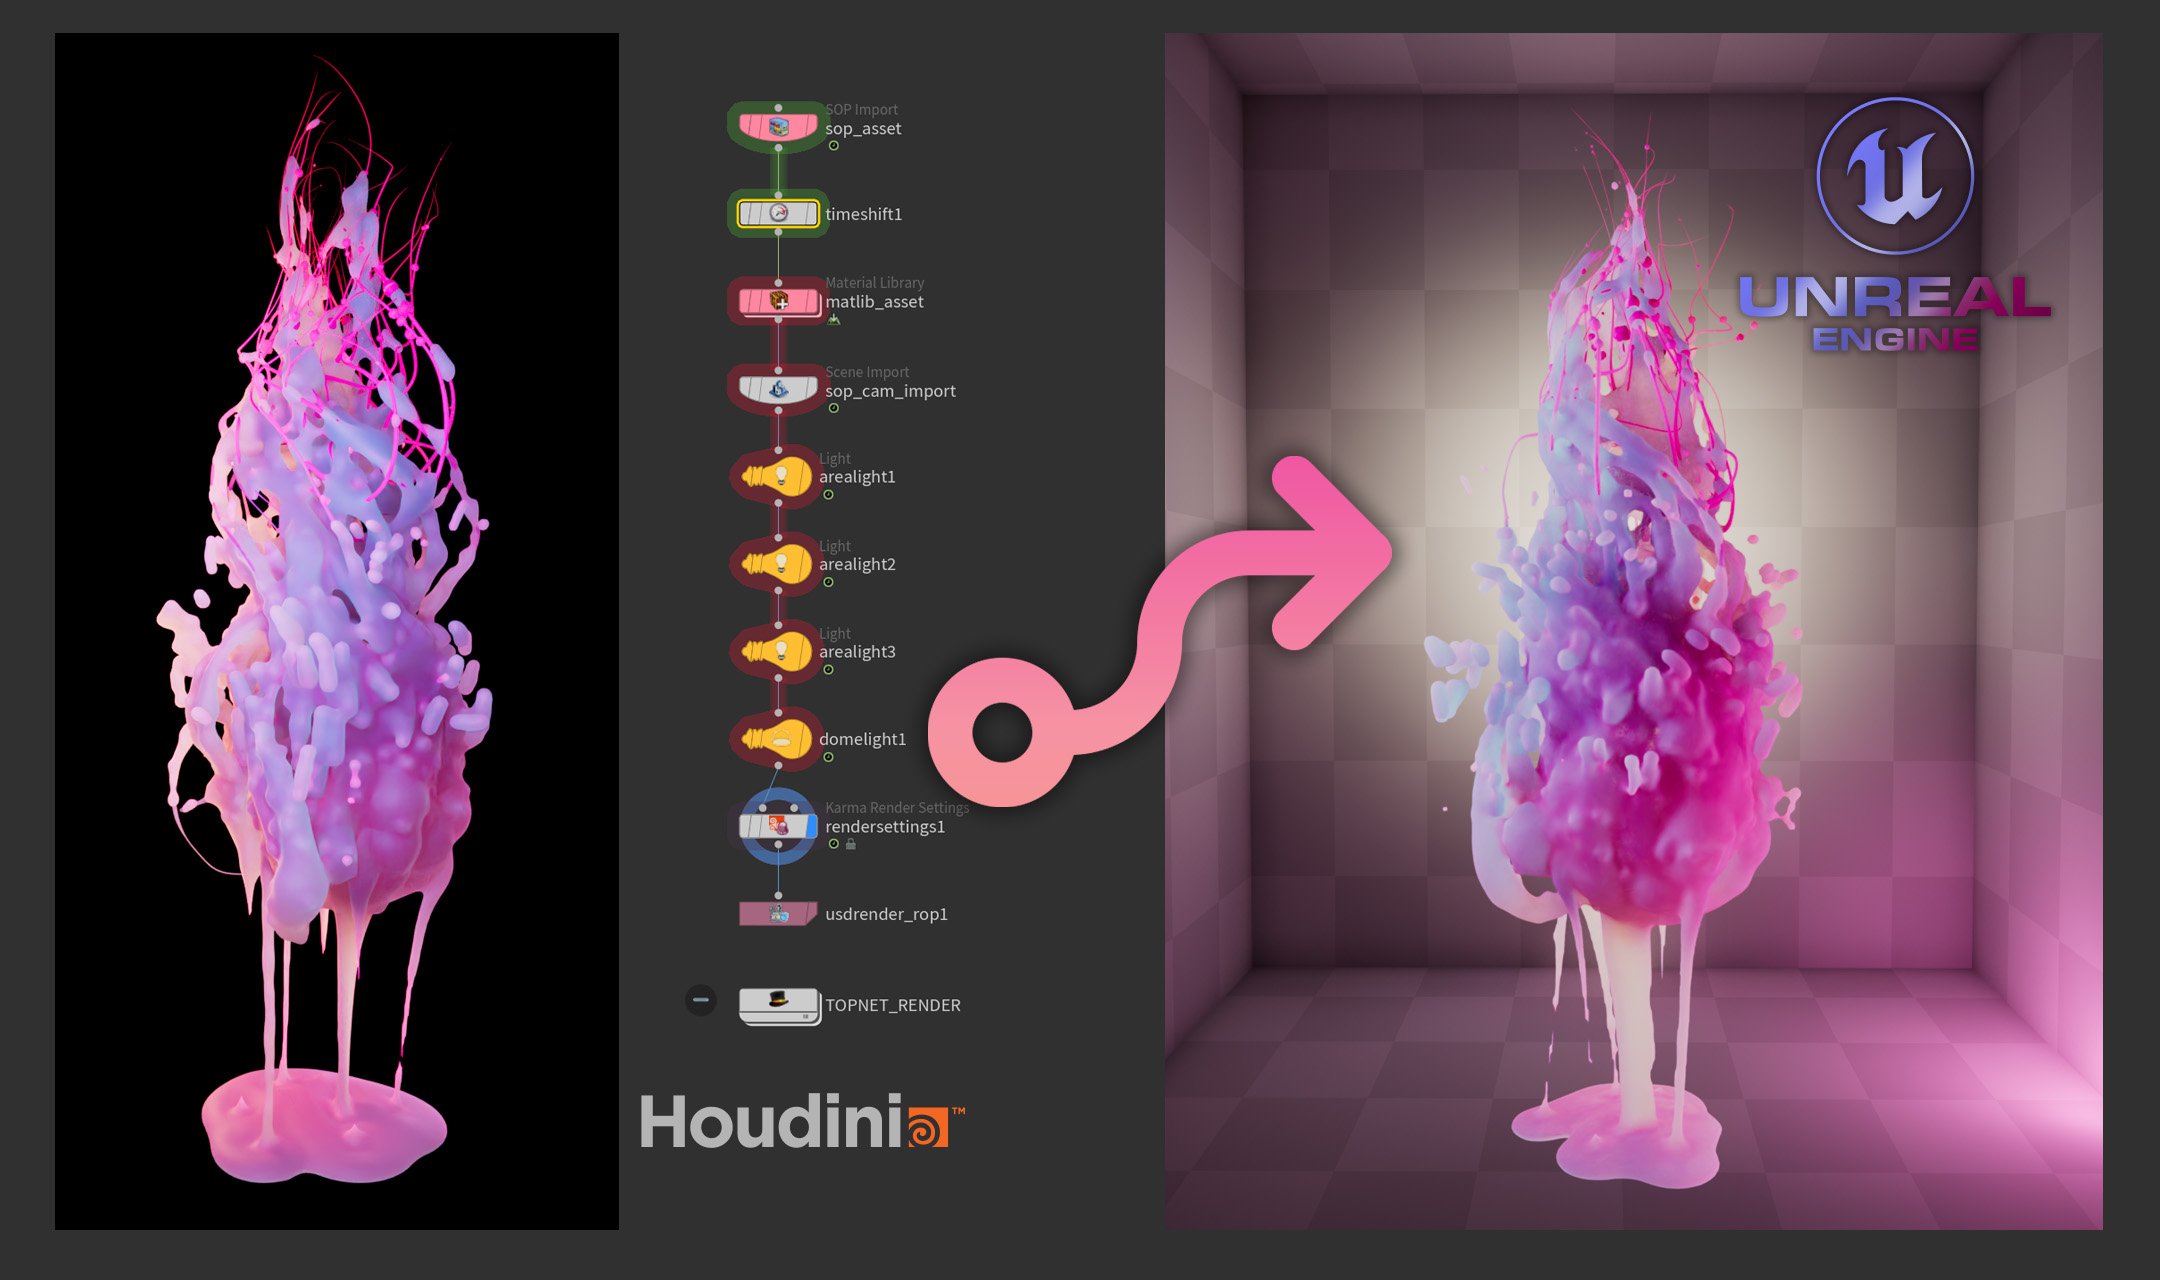
Can you create FX in Houdini and bring them into Unreal Engine as a fully dynamic 4D Gaussian Splat sequence? The short answer is yes. The honest answer is: yes, but — of course there is a but — with limitations. And the interesting answer is how I built a fully automated pipeline to do it anyway, and what I learned along the way.
HIP file available at the end of this article.
Where it started
Gaussian Splats had been on my radar for a while — I knew roughly what they were, but hadn't gone deep on the technique. When I came across a video by Wren Weichman from Corridor Digital about the new generation of 4D Splats, something clicked: could I use this to bring FX into real-time applications that would be impossible to create natively?
This whole thing probably started because the kid in me still likes to take things apart and see what's inside — and because my background in game art means I'm always thinking about real-time techniques.
The tool chain
This pipeline connects several tools. Some are third-party, some are custom workflows I built in Houdini:

GSOPs handles the Gaussian training data generation inside Houdini. Lichtfeld Studio does the actual 4DGS training. On the Unreal side, the trained .ply sequence is played back in real time through the UE5 SplatRenderer plugin.
But the glue holding all of this together — the thing that makes it actually usable — is TOPs. Automation wasn't part of the original plan, but 4D Gaussian Splats require a full set of training images per animation frame. In my case that meant 122 cameras across a 120 frame animation — 14,640 images to render, convert, and process. It got out of hand very quickly. TOPs turned what would have been an unmanageable manual process into a single cook.
The pipeline
From the start I had other users in mind. I wanted to share this project with the community, so I built it to be usable by someone other than me. That meant keeping everything non-destructive — no hardcoded paths, no assumptions baked into the network. A single control hub at the object level holds all the key parameters: asset name, output directory, camera resolution. Everything else in the network references from there. Change one thing in one place, and the whole pipeline updates.
From that foundation, the process breaks down into a few distinct phases. First, creating the FX asset itself and lighting and shading the scene. Then setting up the training cameras — which is where GSOPs comes in. Rather than placing cameras manually, GSOPs distributes them across a mesh that wraps the subject. In my case a sphere, which gives you regular spacing between cameras — and regular spacing matters for training quality. The key customization I added was merging the asset mesh across the full animation range before computing that bounding volume, so the camera rig encapsulates the subject throughout its entire motion, not just at a single frame.

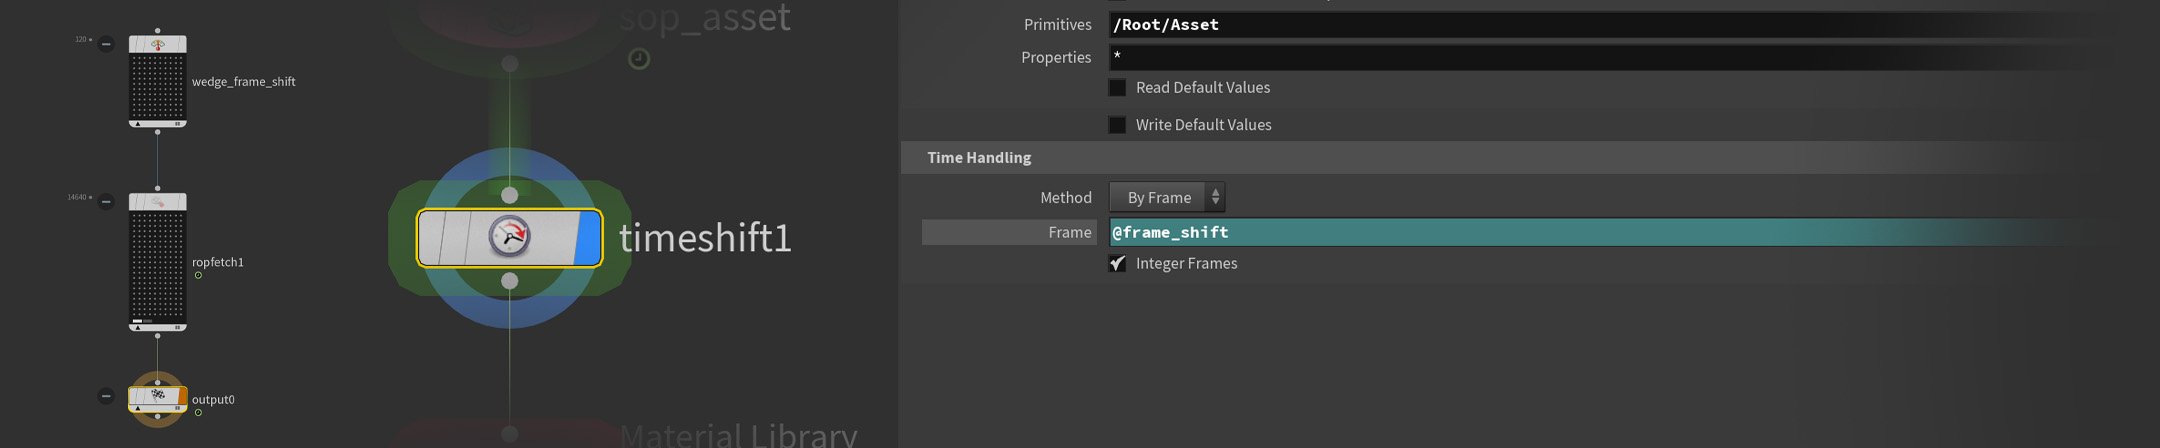
With the scene ready, TOPs takes over. Rendering happens first — all 122 camera positions across all 120 frames in Karma, outputting both a beauty pass and a World Position AOV. One challenge here is that rendering 122 cameras per animation frame means managing two timelines simultaneously — one for the animation itself, one for the camera sequence. A wedge node creates a @frame_shift attribute that drives a TimeShift node in Solaris, keeping both in sync across the full cook. A rop_fetch node handles the render queue, detecting and skipping already-rendered frames so a crashed cook can pick up right where it left off.
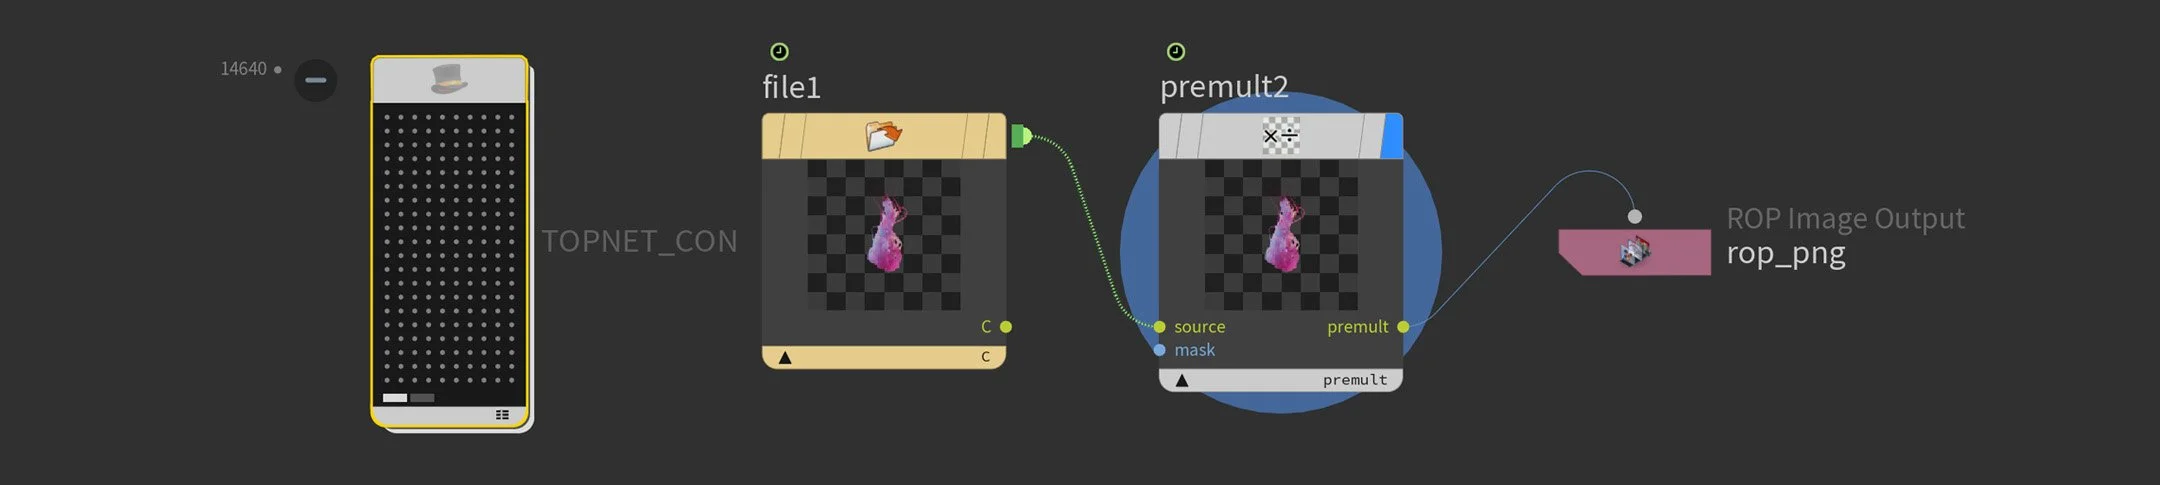
Once rendering is done, a second TOP network batch-converts the linear EXR files to ACES-converted PNGs using COPs. No frame-by-frame babysitting.
This is where it got fun: baking render color to point color
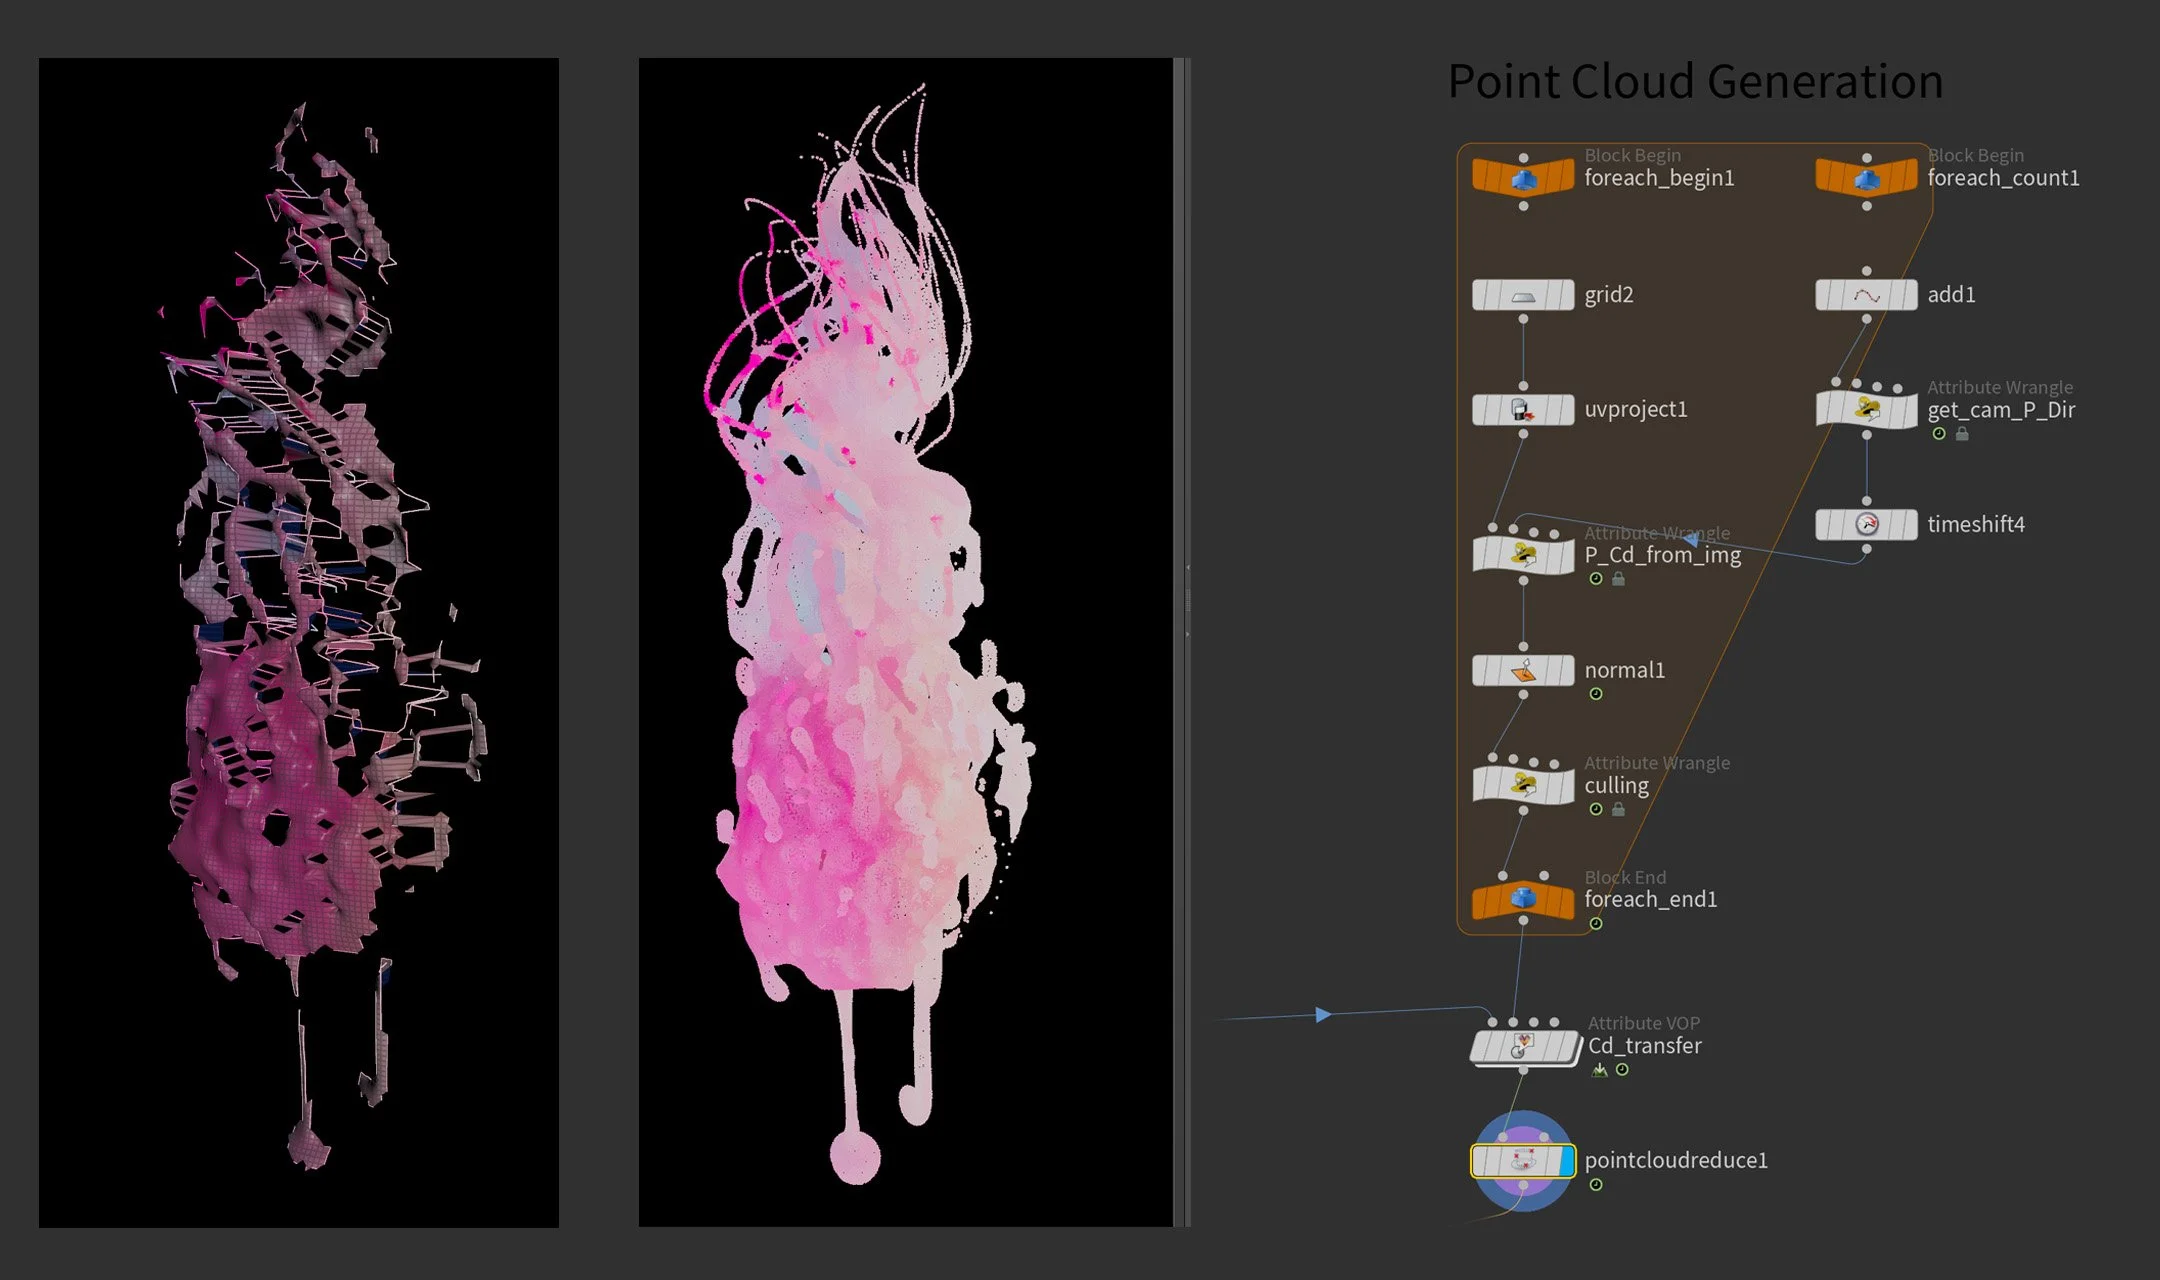
Gaussian Splat training initializes from a point cloud. The quality and color of that point cloud directly influences the densification process during training — which in turn affects the quality of the final splat. Most pipelines use COLMAP for this. I had rendered geometry, so I built something different.
In a For-Each loop I used VEX to read the P(World) and color data directly from the rendered images. For each camera per frame, I create a temporary grid and assign the position and color values to it — effectively reconstructing the visible surface as a point cloud with baked render color. The alpha channel clips away unwanted points, keeping the cloud tight to the actual geometry.
However, even with the alpha clip, some points remained that were visible to the camera but not close to the surface — leading to inaccurate color transfer. To solve this, I generate normals on the mesh and compare them to the camera view direction via dot product, removing any backfacing or very oblique polygons. The result — after merging across all cameras — is a clean, full-coverage color reference which I then transfer onto a separate point cloud scattered directly on the asset geometry. Scattering separately gives much more control over point distribution — in my setup I had multiple objects where I wanted different point densities depending on their role in the scene.
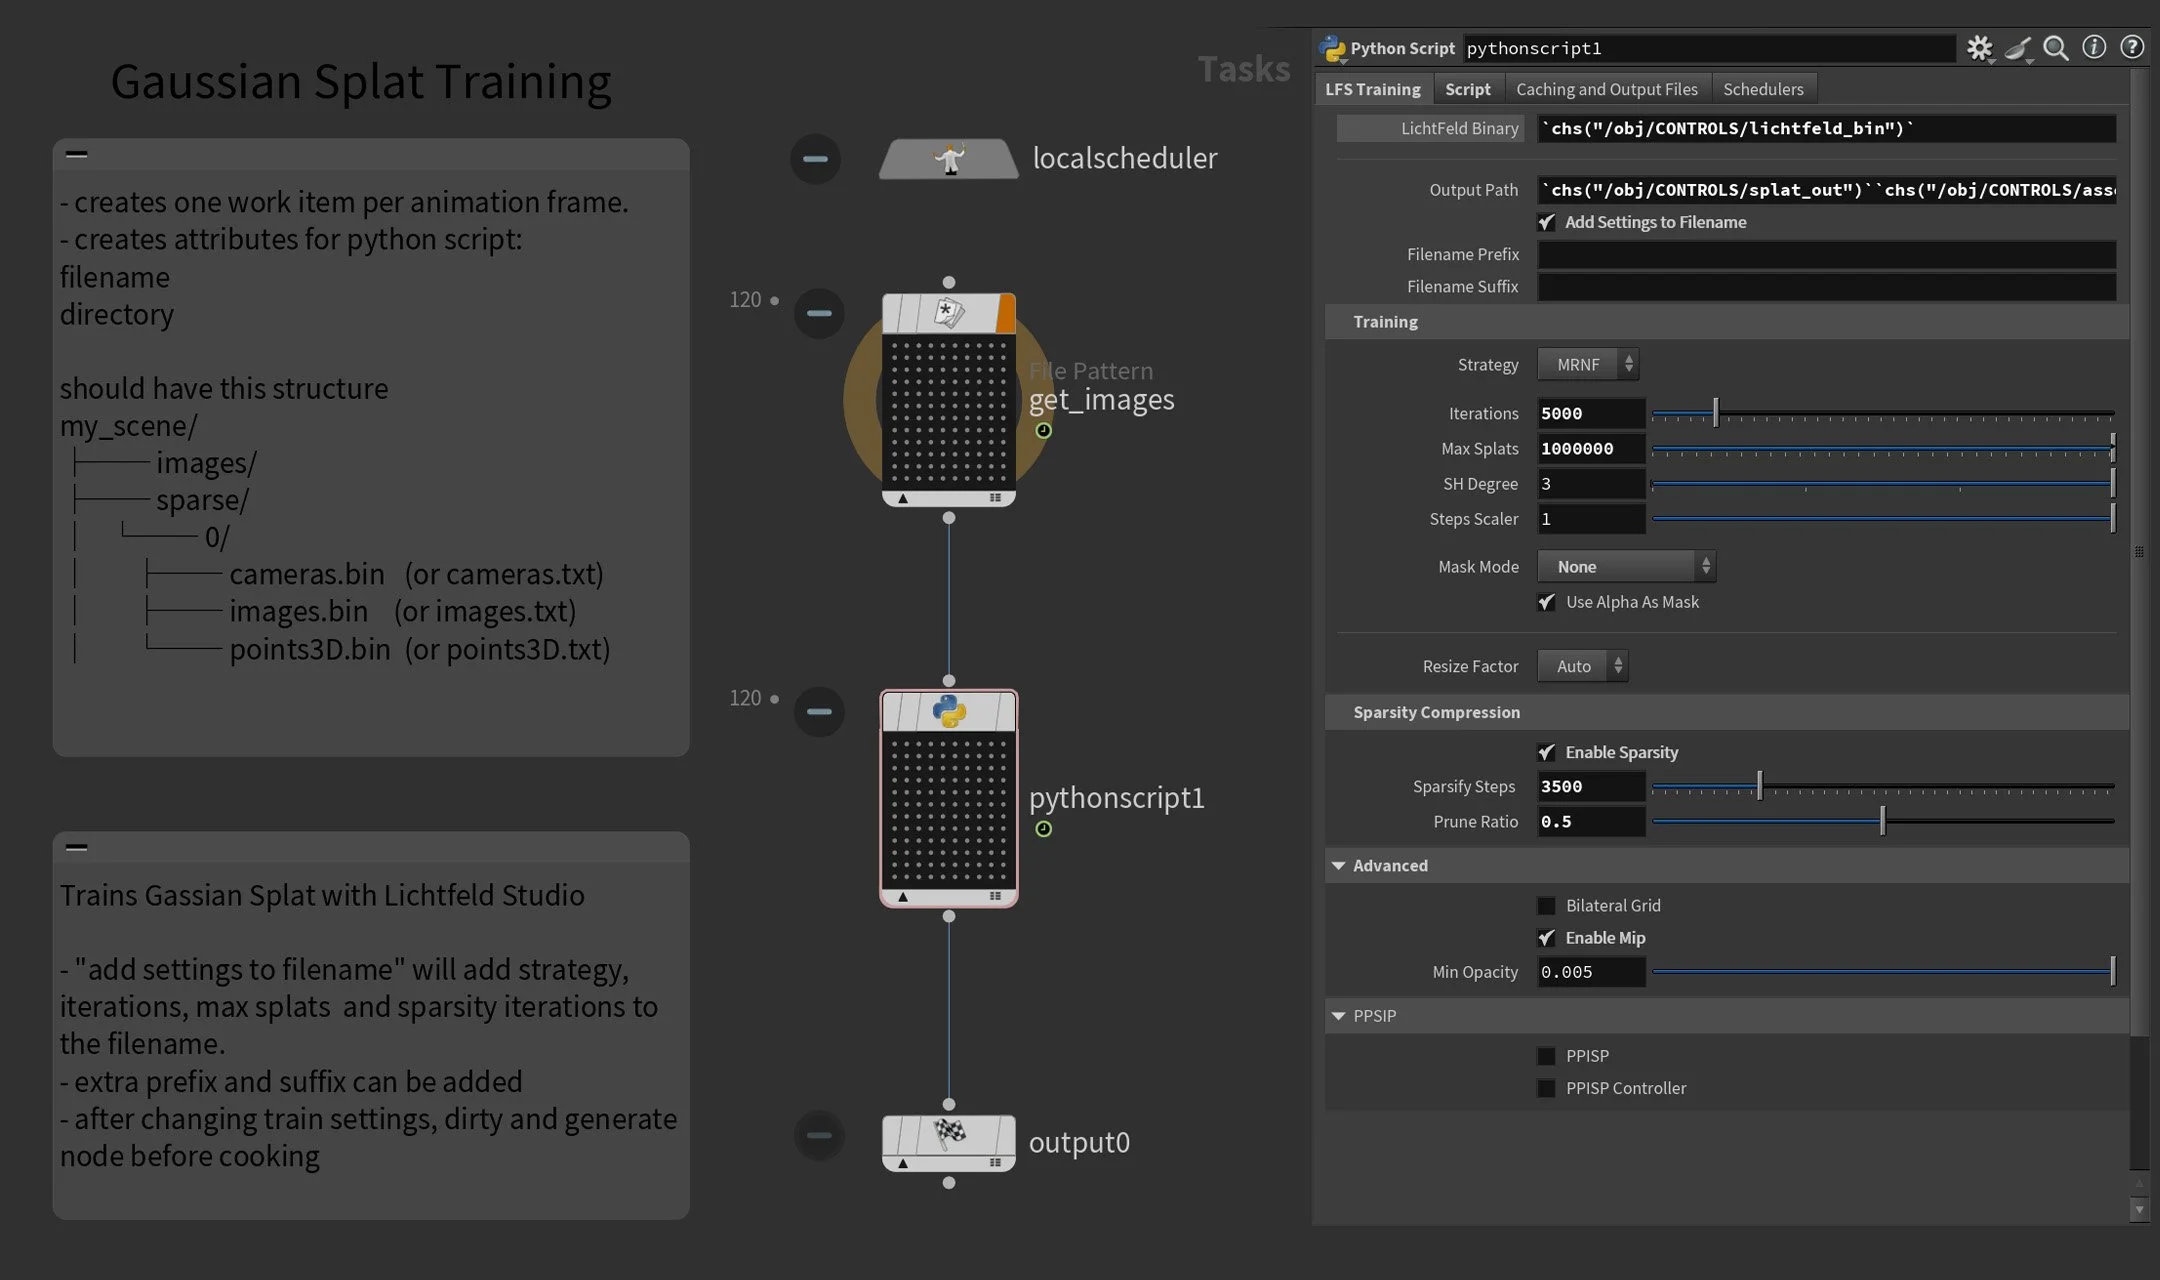
Rather than jumping out of Houdini to configure the trainer separately, I exposed the most relevant Lichtfeld Studio training parameters directly on a Python node — strategy, iterations, max splats, sparsity settings — all accessible from one place inside TOPs. The node communicates with LFS via CLI, with the Python logic built collaboratively with Claude AI.
I also built in several useful tools for iteration — amongst other things, a filename modifier that automatically bakes key training settings into the output name. When you're testing different configurations, being able to tell at a glance what parameters produced which result saves a surprising amount of time.
Finding the sweet spot
122 cameras and 120 frames sounds like a lot — and for the render farm it is. But for a 3DGS reconstruction, 122 cameras is actually on the low side. 4DGS changes the calculus entirely.
Because you're training a separate splat per frame, everything compounds. More cameras means better quality but longer render times and heavier training. Higher resolution means sharper results but exponentially more data. The same tradeoffs apply during training itself — iteration count, densification settings, all of it feeds back into how long you're waiting and what you get out the other end.
There's no universal answer. It depends on your asset, your deadline, and your hardware. But finding that balance — and being able to iterate on it quickly — is exactly where having an automated pipeline pays off. Tweak a parameter, recook, compare. Without TOPs, that loop would be painful.
Into Unreal
The trained .ply sequence gets passed through the 4DGS Converter, which compresses it into a container the SplatRenderer Unreal plugin can read. Import, drop into the scene, hit play.
Honest Results
Not everything works equally well, and it's worth being upfront about that.
The pipeline shines on assets with clean diffuse surfaces and organic motion. Where it struggles is with reflections and noisy textures.
Reflections are a particular pain point — and a bit of an ironic one. Accurate reflections are actually one of the strengths of 3D Gaussian Splatting, resolved by making splats semi-transparent and faking the reflection with splats layered behind or inside the surface. In a static splat that works great. In 4DGS, that same trick introduces a lot of noise across the sequence, and it shows.
Particles are better handled natively in Unreal. Volumes — smoke, fire — I'm still testing.
A note on AI-assisted coding
Most of the Python in this pipeline came from a collaborative process with Claude AI — VEX and the architecture were mine, the Python implementation was AI-assisted. For technical artists who live on the Houdini side of the fence, this kind of workflow is genuinely game-changing
Thanks
A big thank you to David Rhodes from CG Nomads for creating GSOPs and for his support on Discord — the project wouldn't have been possible without it. And to Olli Huttunen for generously sharing his knowledge — check out his YouTube channel if you're diving into this space.
What's next
Volume testing is the obvious next step. The pipeline is built to extend — adding new networks for different export targets or training configurations is straightforward. If you're working on something similar, have questions, or want to nerd out about 4DGS, feel free to reach out.
Download [HIP File]
Shared as-is. It's R&D code, not a polished tool — feel free to break it, learn from it, fork it. Just don't expect support. Released under MIT License.